
CREATING CHILD STATUS & DEMOGRAPHIC RECORDS
How to use this PDS section: The Child Status form captures a child’s demographic and health information over time in the home visiting program.
Entering information
All information entered on the Demographics and Status report must be participant-reported on behalf of the child.
If a participant has multiple births for one pregnancy then staff must create a separate Child Status record for each child.
The numbers listed after questions in the manual (i.e. PPF 37) refer to the question in the Healthy Families Family Profile Postpartum form (PPF), Pregnancy form (PREG) and/or Six Month Update (Six Mo) that corresponds to the information to be entered into PDS.
Timing of documentation and updates
Once a target child has been born, staff must complete a child status report at the same time that he/she completes a participant status report.
Child status reports are not based on the age of the child. The date of the child status report always corresponds to the date of the participant status report.
If the participant has not yet had his/her baby at the time the home visitor completes a participant status, the home visitor does not create a child status for that time label (i.e. initial, 6 month, 12 month, etc.) However, if a child is born while a participant’s status window is open, a child status should be created.
If a participant enrolls during the postpartum period, then the home visitor will create an initial child status record for the baby at the time of enrollment and at all six month intervals.
Why this information is important: Documenting accurate information allows the home visitor to review the child’s progress throughout their participation in Health Families.
HFM policies related to this section: Standardized Assessment and Information Gathering Policy
Step-by-Step Instructions
Fields with an asterisk (*) are required.
1. On the participant’s profile page select Edit to access the participant’s family record.
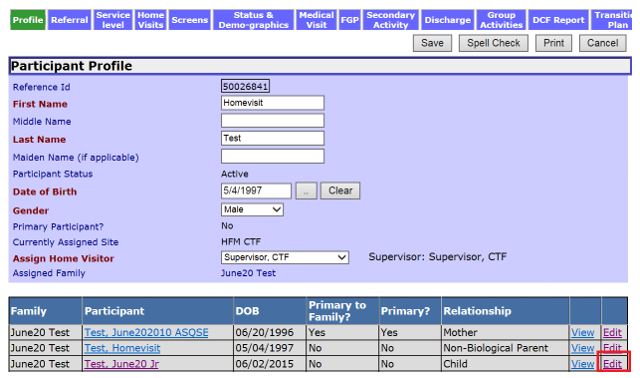
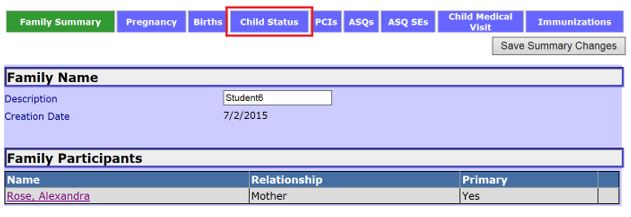
2. Click the Child Status tab at the top of the page.
3. PDS will automatically calculate and display the valid 45-day window to complete the initial status and the 60-day windows to create all subsequent statuses based on the date of the participant’s initial and subsequent status records.
3.1 You will only be able to edit Status reports that are in an open window. Open windows will display start and end dates in green.
4. To create a Status record, click Create (child) next to the open status window. After the status record is created, the text will change to Edit and the record can be edited. Click View to view a record that has already been entered.
Alternatively, you can navigate to Child Status page through the Participant Status page. See Creating Participant Status and Demographics Records for more information.

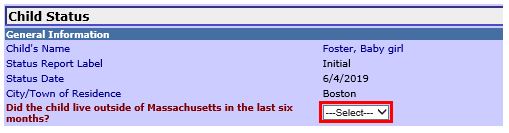
4. You should now be on the Child Status page for the open status window. Enter the following under the “General Information” section.
4.1. Child’s Name: This field will auto-populate.
4.2. Status Report Label: This field will auto-populate with information from the participant status report.
4.3. Status Date: This field will auto-populate with information from the participant status report.
4.4. City/Town of Residence: This field will auto-populate with information from the participant status report. If this information was not completed in the participant status report there will be a prompt instructing the user to enter the information in the participant status.
4.5. * Did the child live outside of Massachusetts in the last six months? (PPF 44, Six Mo 31)
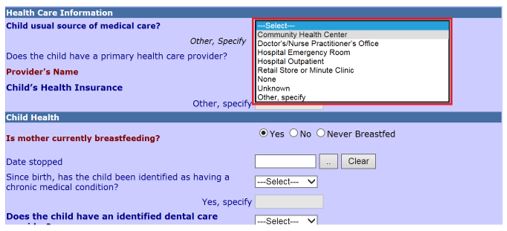
5. Enter the following information in the “Health Care Information” section.
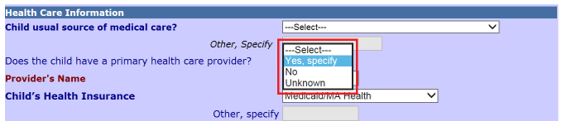
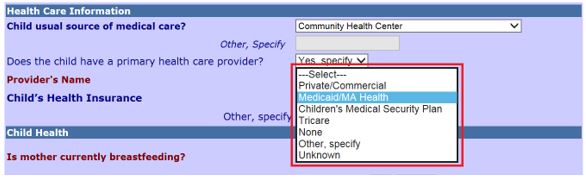
5.1. Child usual source of medical care? Select the location that the participant reports the child receives medical care from most frequently. (PPF 50, 6 MO 12)
5.1.2 Enter the child’s usual source of medical care if Other, specify was chosen for Child’s usual source of medical care?

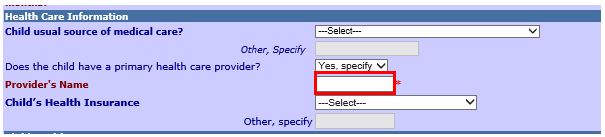
5.2. Does the child have a primary health care provider? (PPF 49, 6 Mo 11)
5.3. * Provider’s Name: Enter the Provider’s Name. This could be the name of a healthcare practice (i.e. Harvard Vanguard Quincy) or the name of an individual provider (e.g. Dr. Wilton).This field is required if Yes, specify was selected for Does the child have a primary health care provider? (PPF 49, 6 Mo 11)
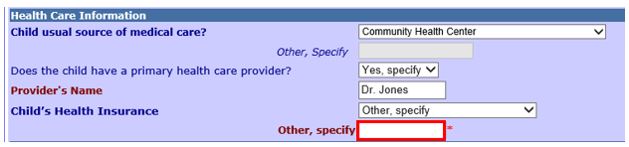
5.4. Child’s Health Insurance Select the type of health insurance the child has from the dropdown menu (PPF 46, 47, 6 Mo 8,9)
5.4.1 Other, Specify: Enter the child’s insurance type if Other, specify was selected for Does the participant have health insurance?
6. In the “Child Health” section, enter the following information:
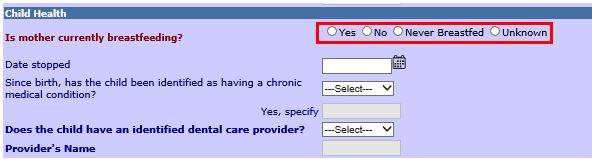
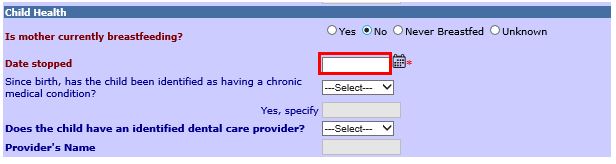
6.1. * Is mother currently breastfeeding?* (PPF 25, Six Mo 14)
6.2. *Date Stopped: If you selected No to Is mother currently breastfeeding? record the date the mother stopped breastfeeding here. Date Stopped must be after than the child’s date of birth. This field is required and only needs to be completed if the mother was breastfeeding the child at some point since the last status report.
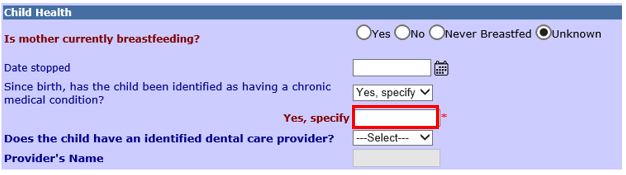
6.3. Since birth, has the child been identified as having a chronic medical condition? (PPF 53, Six Mo 18)
6.3.1 Yes, specify: Enter any chronic medical condition(s) identified. This field is required if you selected Yes, specify to Since birth, has the child been identified as having a chronic medical condition?
6.4. Does the child have an identified dental care provider? (PPF 52, 6 Mo 16)
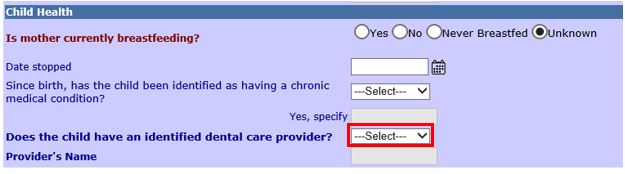
6.5. Provider’s Name: If the child has an identified dental care provider, enter the name here. This can be the name of a dental practice (Holyoke Gentle Dental) or individual provider (Dr. Avila). This field is required if Yes, Specify was selected for Does the child have an identified dental care provider? (PPF 52, 6 Mo 16)

7. Save: Select to save the information.
8. Save & Close: Select to save the information and go to the Child Status History page.
8. Save and Go to Parent Status: Select to save the information and go to the Participant Status History page.
9. Spell Check: Select to checking the spelling of text on the form.
10. Cancel: Select to return to the Child Status History page without saving.
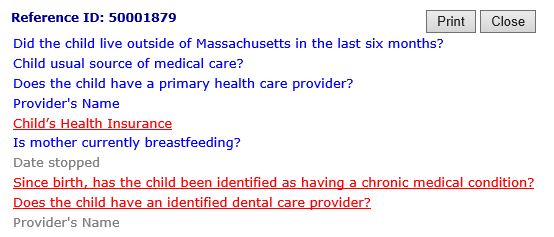
11. Audit: Select to call up a pop-up screen that summarizes all audited fields not completed. Users may print this pop-up screen to help them gather needed information to complete the form. In the example below, the items in red are missing information.
12. Print: Select to print the child status record.
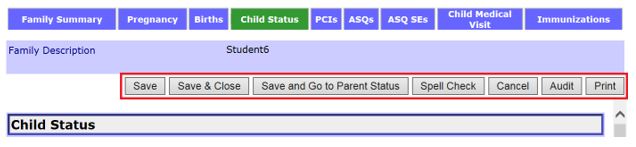
13. Save and Create Sibling’s Child Status: For families with more than one child, select this button to save the Child Status for one child and immediately go the Child Status for the next child.

14. Ready for Review: Select to indicate that the information on the record is complete and ready for a supervisor or coordinator to review.

Creating a Child Status Record (Sept 2019)
©2019 MA Children's Trust