
CREATING A PERSONNEL CHANGE NOTIFICATION (PCN)
How to use this PDS section. This section includes instructions on creating, changing, and removing PDS access for Healthy Families Massachusetts staff. Program Coordinators and Supervisors use the Personnel Change Notification (PCN) form within the Staff Management section of the PDS to inform the Healthy Families Implementation Team (HFMIT) of staffing changes.
PCN Permissions
Supervisors may request PDS log-ins for new home visitor users. Coordinators may request PDS log-ins for new home visitors, supervisors, or other users. Coordinators may also create PCNs for terminations, position changes, and changes to existing staff rights and permissions within PDS.
Why this information is important: Coordinators and Supervisors are responsible for making sure that staff have access to PDS according to their job roles and responsibilities. Delays in submitting timely PCNS will result in staff not having access needed to perform their jobs or, in the case of terminations, individuals having access to confidential information that they are no longer allowed to have access to.
HFM policies related to this PDS section: Program Administration Policy & Staff Recruitment and Retention Policy
There are three sets of instructions in this PDS section:
I. Creating PDS Profiles for New Staff Members
II. Editing Existing Staff Records
III. Creating a PCN Request for Existing Staff Members
Fields with an asterisk (*) are required.
I. Creating PDS profiles for new staff members
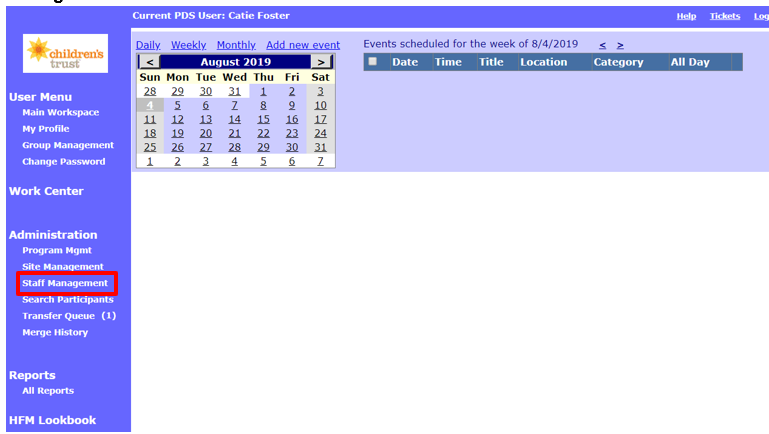
1. In the “Administration” section on the left hand side of the screen click on Staff Management. 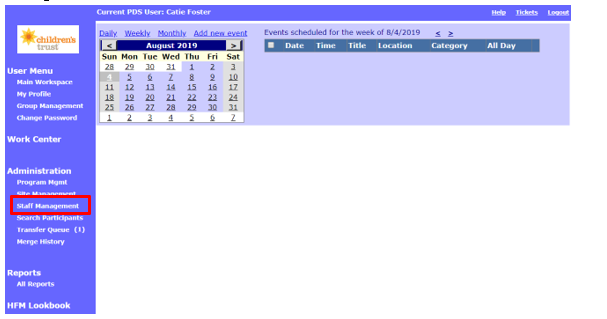
2. First, search for existing staff members to ensure that you are not creating a duplicate staff member.
2.1 Enter the staff member’s first and last name.

2.2 Select Active if the staff member is currently working at an HFM program. Select Inactive if the staff member previously worked for an HFM program.

2.3 If the staff member’s name appears, you do not need to create a new PDS account for him/her. Click his or her name to create a PCN to re-hire the person. See the instructions on this PDS page for re-hiring staff members in PDS.

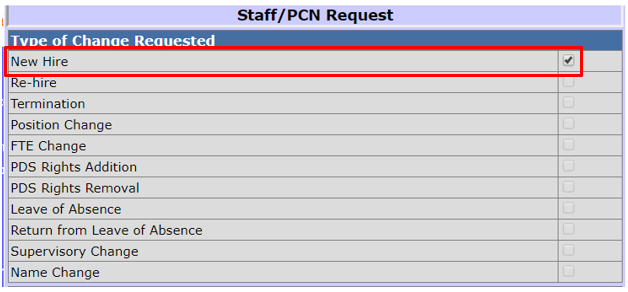
3. If you do not see the staff member’s name listed, click Create New Staff (PCN).

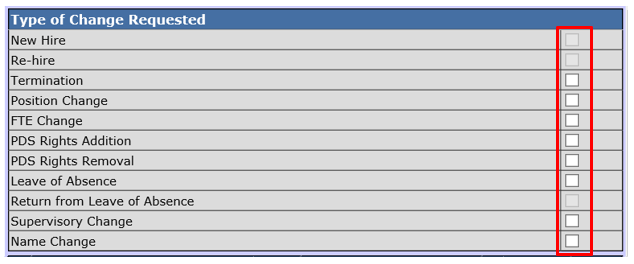
4. You will see a table called “Type of Change Requested.” New Hire should be checked.
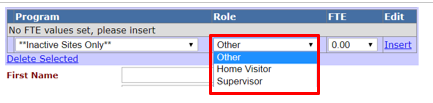
5. Enter information about the new staff member’s role.
5.1 Program: Select the new staff person’s HFM program from the Program drop down menu.

5.2 Role: Select the new staff person’s role from the Role drop down menu.
Note: Program Coordinators can only create PCNs for Supervisors, Home Visitors and Other program staff such as Administrative Assistants and Group Data Managers. HFMIT staff will create new PCNs for Program Coordinators. When a new Program Coordinator is hired, including those who are responsible for more than one site, submit an IT ticket through JIRA including the name of staff, their date of hire, FTE on the Healthy Families contract, and the Healthy Families site(s) in which they are responsible for.
5.3 FTE: Select the new staff person’s Full-time Equivalency (FTE) from the FTE drop down menu. You may select between .01 and 1.00 FTE. FTE is the number of total hours a HFM staff person works for the program each week divided by the maximum number of hours weekly, as set by the agency. For example, someone who works 10 hours a week at an agency with 40 hour maximum work weeks has 0.25 FTE (10 / 40).
5.4 Click Insert to add the role to the new staff member’s PDS profile.

5.5 If the new staff person has more than one role in HFM (i.e. half-time home visitor and half-time other), enter more roles as needed using the steps above.
5.6 To delete a role, select the check box next to the role and click Delete Selected.
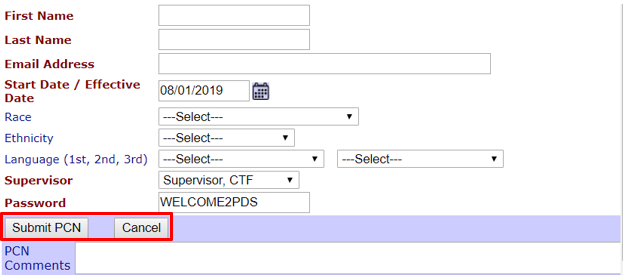
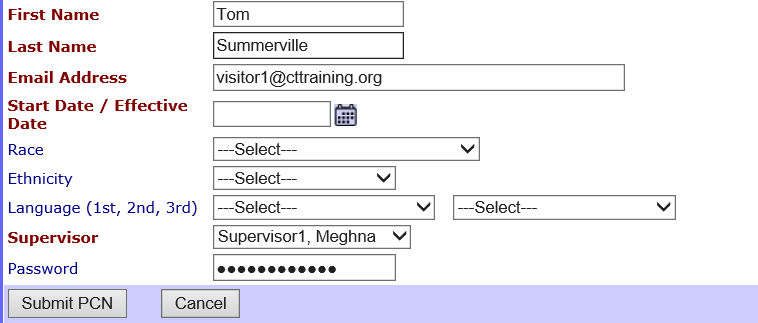
6. Enter the following information in the rest of the Staff/PCN Request form:
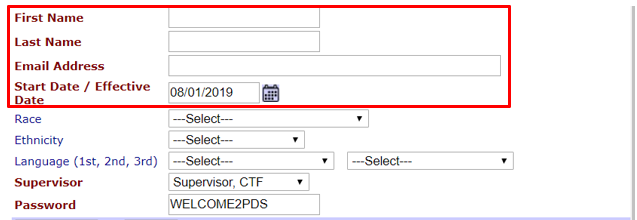
6.1 *First Name: Enter the first name of the HFM staff person
6.2 *Last Name: Enter the last name of the HFM staff person
6.3 *Email Address: Enter the email address of the HFM staff person
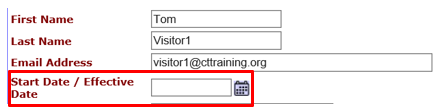
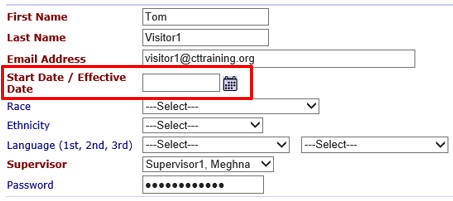
6.4 *Start Date/Effective date: Click the calendar icon to select the date of hire or the date PDS access is effective.
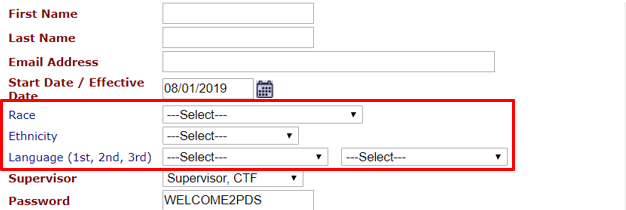
6.5 Race: Select the Race of the HFM staff person from the drop down box.
6.6 Ethnicity: Select the Ethnicity of the HFM staff person from the drop down box.
6.7 Language (1st, 2nd): Select the languages spoken by the HFM staff person in the order of preference (first preference in left box, second preference in right). You may select up to two languages.
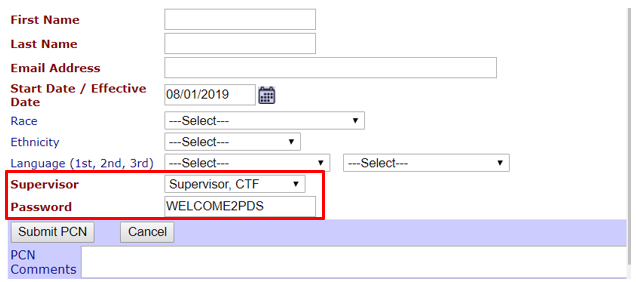
6.8 *Supervisor: Select the HFM supervisor who will provide ongoing supervision to the HFM staff person.
6.9 Password: The default temporary password is WELCOME2PDS. Users will need to change their temporary password the first time they log in to PDS. If you would like to change the temporary password, enter a new password here.
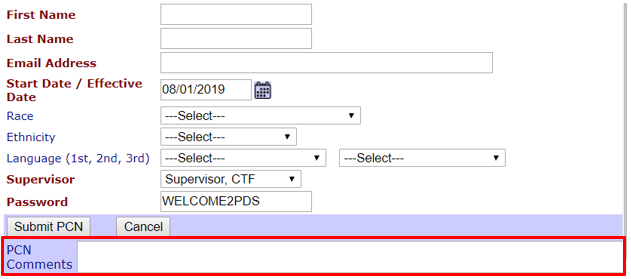
6.10 PCN Comments: Use this section to indicate any special notes on the PDS staff rights and permissions for this staff person.
7. Click Submit PCN to save the information and create a new PDS user.
7.1 When you click Submit PCN, an automated notification email will be sent to HFMIT staff. Staff at DPH and the PDS support team also receive the PCN notification emails. The subject line will be “PCN has been accepted.” The email will include PCN request details and any comments you added in the PCN Comments box.
8. Click Cancel to return to the Staff Management page without saving.
II. Editing existing staff records
1. In the “Administration” section on the left hand side of the screen click on Staff Management.
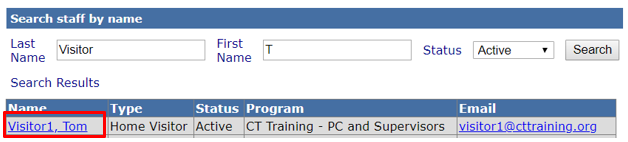
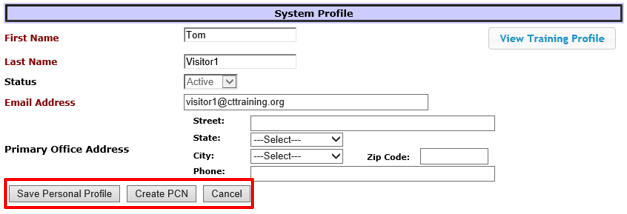
2. Enter at least one letter of the staff member’s last name in the Last Name field and one letter of his/her first name in the First Name field. In the example below, the user is looking for a staff member named Tom Visitor.

2.1 In the Status drop down menu, select Active to search for current staff or Inactive to search for former staff.

2.2 Click Search.

2.3 Click the staff member’s name to modify or view the staff record.
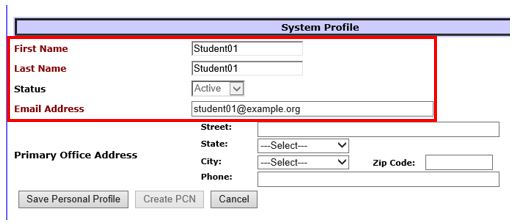
3. Edit fields in the “System Profile” section as needed.
3.1 *First Name: Enter the staff member’s first name.
3.2 *Last Name: Enter the staff member’s last name.
3.3 Status: This field is greyed out and cannot be changed. To change a staff member’s status, you must submit a PCN.
3.4 *Email address: enter the staff member’s email address.
3.5 Street: Enter the street of the staff member’s office address.
3.6 State: Select the state of the staff member’s office address.
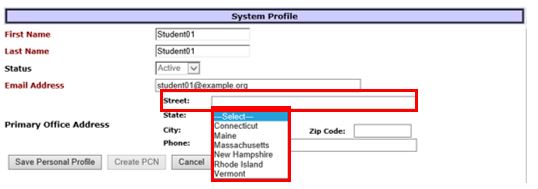
3.7 City: Select the city of the staff member’s office address.
3.8 Zip Code: Enter the zip code of the staff member’s office address.
3.9 Phone: Enter the staff member’s phone number.
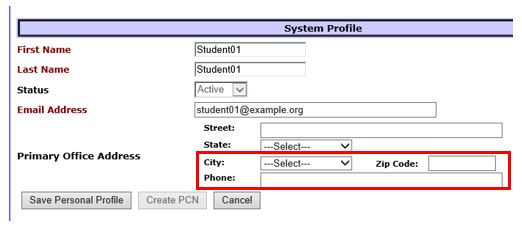
4. After making changes to the “System Profile” section, select the appropriate option for changes to the staff member’s PDS profile.
4.1 Save Personal Profile: Select to save current changes to the HFM staff person’s profile. Selecting this option will not change the staff member’s role or access rights in PDS.
4.2 Create PCN: Select to make other changes to the staff person’s record, including termination, role, and supervisor assigned. See the next section on Creating a PCN Request for more information.
4.3 Cancel: Select to cancel changes. Any unsaved changes will be lost.
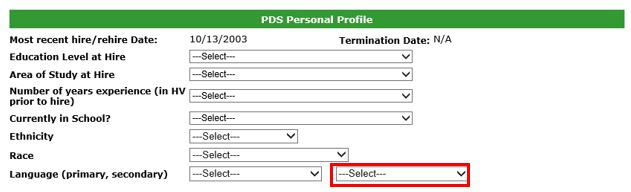
5. Edit fields in the “PDS Personal Profile” section as needed.
5.1 Most recent hire/rehire Date: This information will auto-populate.
5.2 Termination Date: This auto-populates as N/A for current PDS users.
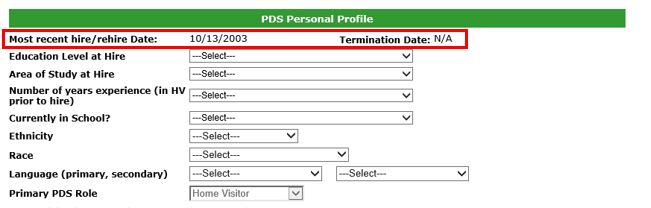
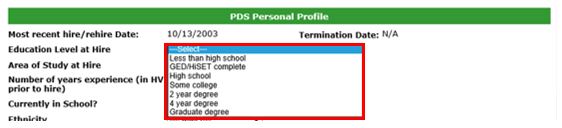
5.3 Education Level at Hire: Select the staff member’s level of education when he/she was hired.
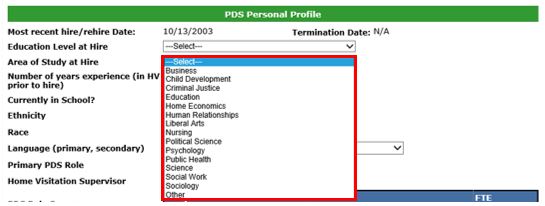
5.4 Area of Study at Hire: Select the area the staff member studied prior to being hired. If he/she studied in more than one area before being hired, select the area that was his/her primary focus.
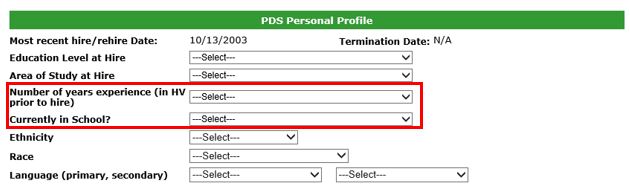
5.5 Number of years experience in HV prior to hire: Select the number of years of experience in home visiting the staff member had prior to being hired. Select from less than one year to 50 years.
5.6 Currently in School: Select the appropriate response based on the staff member’s current school status:
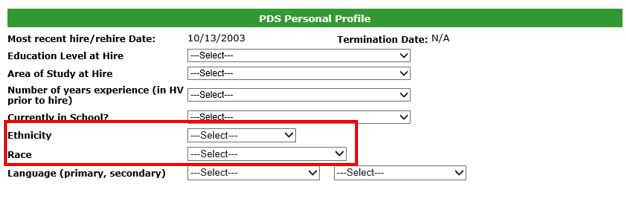
5.7 Ethnicity: Select the appropriate response based on how the staff member identifies his/her ethnicity:
5.8 Race: Select the appropriate response based on how the staff member identifies his/her race.
5.9 Language (primary, secondary): Select the staff member’s primary and secondary (if applicable) language(s) from the dropdown lists.
5.9.1 Select the staff member’s primary language from the box on the left.
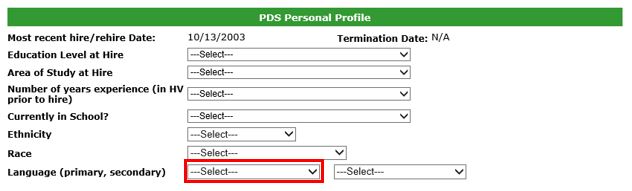
5.9.2 Select the staff member’s secondary language from the box on the right.
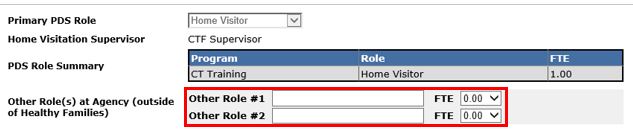
5.10 Primary PDS Role: This field will auto-populate with the staff member’s PDS role, which determines his/her user rights in the system.
5.11 Home Visitation Supervisor: This field will auto-populate based on the staff member’s supervisor assigned in PDS.
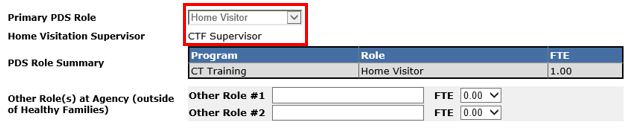
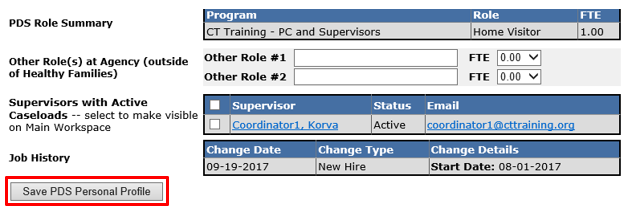
5.12 PDS Role Summary: This table will auto-populate based on the history of the staff member’s PDS role changes and FTE status. For example, if the staff member is hired as a part-time home visitor and later become a full-time home visitor, you will see entries showing these FTE changes.
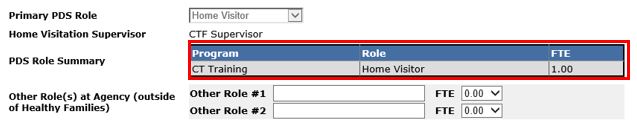
5.13 Other Role(s) at Agency (outside of Healthy Families): Enter any other roles at the staff member’s agency outside of HFM. You may enter up to two other roles.
5.13.1 Enter the name of the staff member’s role in the text box.
5.13.2 Select the amount of FTE for the staff member’s role. You may select between 0.01 and 1.00 FTE.
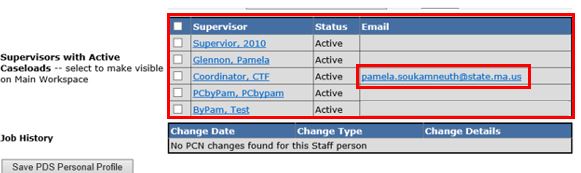
5.14 Supervisors with Active Caseloads: This list will display all supervisors at the staff member’s site who have active caseloads. Click on any supervisor’s name to compose an email to him/her. Coordinators can change their caseload view in the Main Workspace by selecting which supervisors’ caseloads they want to appear. See more instructions in the Introduction for Supervisors and Coordinators.
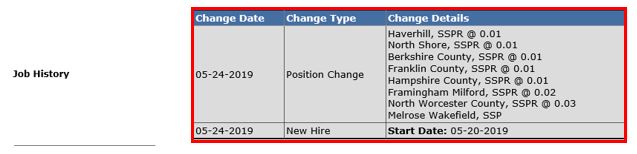
5.15 Job History: This list will auto-populate with any changes in the staff member’s job history. For example, if the staff member is hired as a home visitor and later become a supervisor, both job roles will appear in the Job History table.
Note: Staff are encouraged to edit their participant profiles using their unique logins to PDS. Please see the Intro and Overview section of the PDS manual for more information. However, sometimes Supervisors and Program Coordinators may need to edit the staff records on behalf of the home visitor.
6. Click Save PDS Personal Profile to save changes to the “PDS Personal Profile” section.
III. Creating a PCN Request for existing staff members
1. If you selected Create PCN in the staff member’s “System Profile” section, PDS will direct you the Staff/PCN Request Form.
2. Select the Type of Change Requested by checking the checkbox next to the change you want to make. Only one checkbox can be selected at a time. You will need to complete a separate PCN request for each change you make to a staff record. For example, if a staff person returns from a leave of absence and is changing positions from a home visitor to a supervisor, you will need to submit one PCN for a return from leave and a second PCN for a position change.
3. Based on the selection you made in the “Type of Change Requested” section, make changes to the rest of the Staff/PCN Request as needed:
3.1 For Re-hires: Enter the Start Date for the returning HFM staff person.
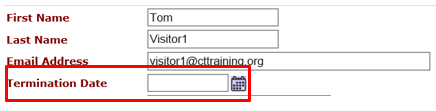
3.2 For Terminations: Enter the Date of Termination.
3.2.1 Important note: If you select today’s date as the termination date, the staff member will have access until the end of the day.
3.3 For Position Changes: Click Edit to change the role of the HFM staff person.

3.3.1 Select the staff person’s new position from the Role drop down menu.

3.3.2 Click Submit once the appropriate new role has been selected. Click Cancel to remove your changes and return to the staff member’s original role.

3.3.3 Enter the date the position change is effective in the Start Date/Effective Date field.
3.4 For FTE Changes: Click Edit to change the FTE of the HFM staff person. This number may range from 0.01 to 1.0.

3.4.1 Select the staff person’s new FTE from the FTE drop down menu.

3.4.2 Click Submit once the appropriate new FTE has been selected. Click Cancel to remove your changes and return to the staff member’s original FTE.

3.4.3 Enter the date the FTE change is effective in the Start Date/Effective Date field.

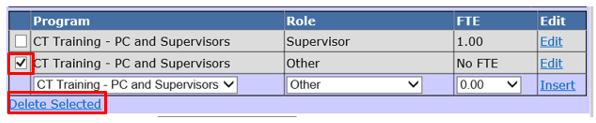
3.5 For PDS Rights Addition: Enter the person’s new PDS rights as a new role without FTE. In the example below, a supervisor is being given coordinator rights.

3.5.1 Click Insert to add the staff member’s PDS right to his/her profile.

3.5.2 Enter the date the PDS rights addition is effective in the Start Date/Effective Date field.

3.6 PDS Rights Removal: Delete the role that gives the staff person rights that they should no longer have in PDS. In the example below, a supervisor is having coordinator rights removed.
3.6 Select the checkbox next to the rights that should be remove and click Delete Selected.

3.6.1 Enter the date the PDS rights removal is effective in the Start Date/Effective Date field.

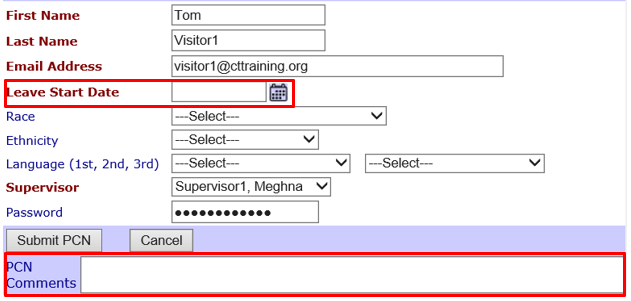
3.7 Leave of Absence: Enter the staff member’s leave start date in the Leave Start Date box. Enter the anticipated date of return in the PCN Notes box.
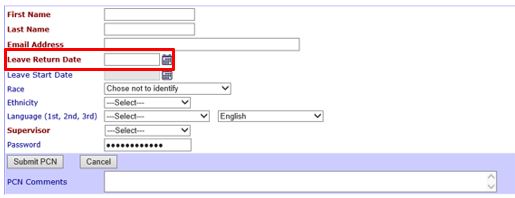
3.8 For Returns from Leave of Absence: Enter the staff member’s leave start date in the Leave Return Date box.
3.9 Supervisory Change: Select the name of the new supervisor using the Supervisor drop down list.
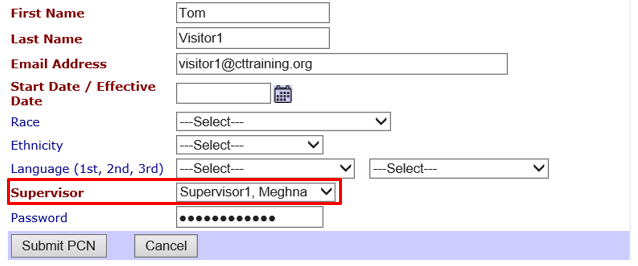
3.9.1 Enter the date the supervisory change is effective in the Start Date/Effective Date field.

3.10 Name Change: Enter the staff member’s new First Name and/or Last Name in the required fields. Enter the person’s previous name in the PCN Notes box.
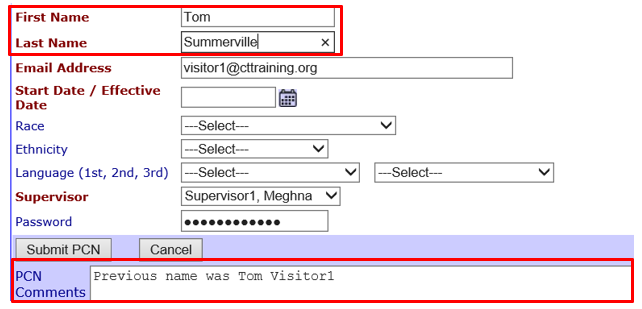
3.10.1 Enter the date the name change is effective in the Start Date/Effective Date field.

4. Click Submit PCN once the desired changes are complete.
5. Like creating a new PDS user profile for a new staff member, editing an existing staff member’s PDS account will send an automated notification email to staff on the HFMIT, DPH, and PDS support teams.
Creating a PCN (Sept 2019)
©2019 MA Children's Trust