
CREATING AN ADDRESS RECORD
How to use this PDS section: Use the address record to keep a record of current and past contact information for participants, their friends and family members, and service providers. Staff should update the participant’s contact information any time it changes (e.g. s/he moves, changes a phone number or adds an additional phone number). If possible always get multiple contacts for where you can reach a participant such as a neighbor or family member in case a participant’s pre-paid phone runs out, home phone is disconnected or he/she moves suddenly, etc.
Why this information is important: Keeping accurate and up-to-date contact information for participants, family members, friends, and other service providers helps HFM staff deliver high-quality services.
HFM policies related to this PDS section: Service Level and Creative Outreach Policy
Step-by-Step Instructions
Fields with an asterisk (*) are required.
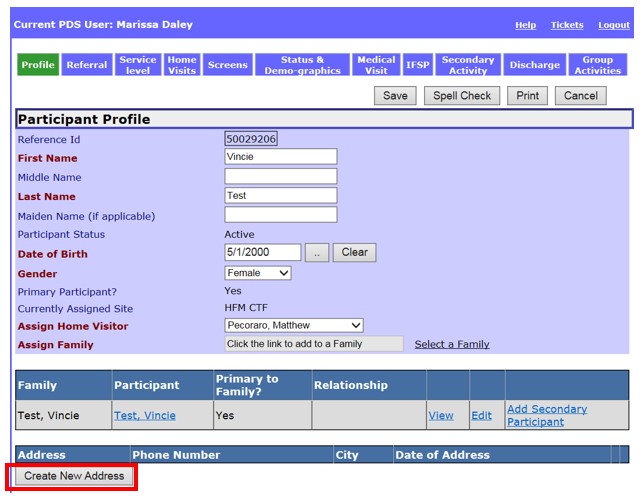
1. In the participant’s record click on Profile at the top of the screen.
2. Click the Create New Address button.
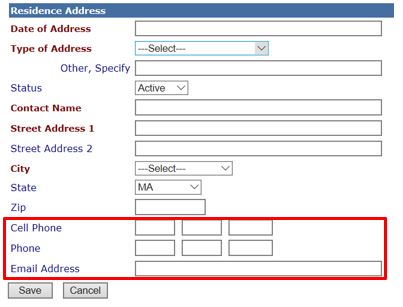
3. Enter the following information under the “Residence Address” section:
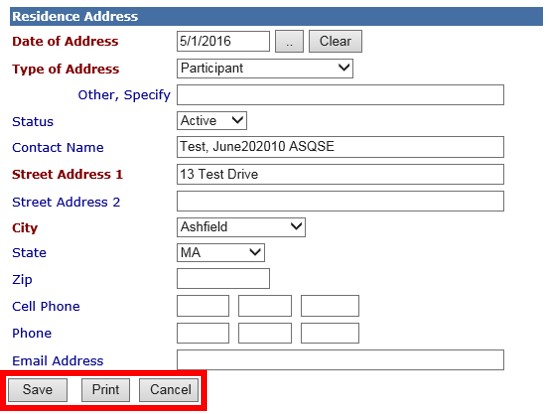
3.1* Date of Address: Enter the date in which the address is being entered into PDS. You can write the date in several formats:
3.2 *Type of Address: Select the type of address being entered into PDS from the below list.
3.3 Other, Specify: Enter the type of address if you selected Other in the Type of Address drop down. This field is required if you selected Other for Type of Address.

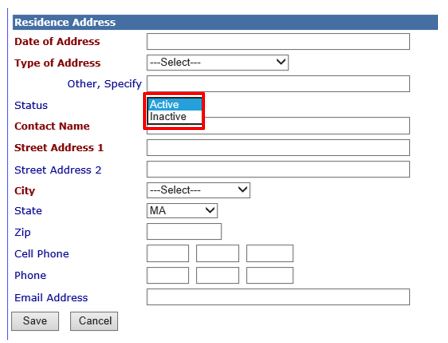
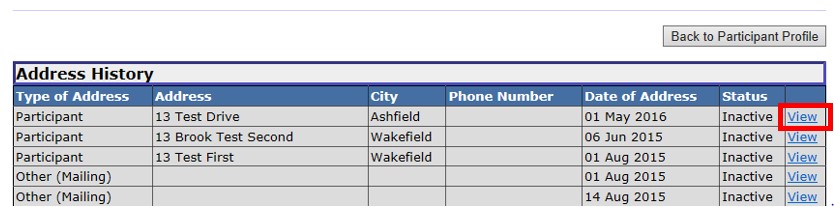
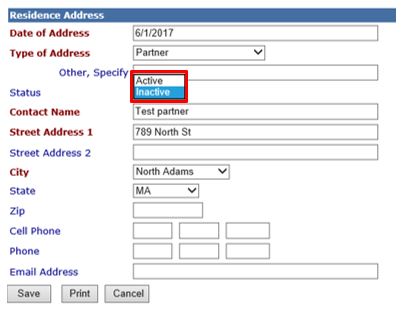
3.4 Status: This drop down is used to distinguish what contact information in PDS is current and which entries are no longer current but are being saved for historical information. Once an address record is made inactive, it appears only in the address history page. A participant may have more than one active address in PDS, such as a mailing address and a physical address.
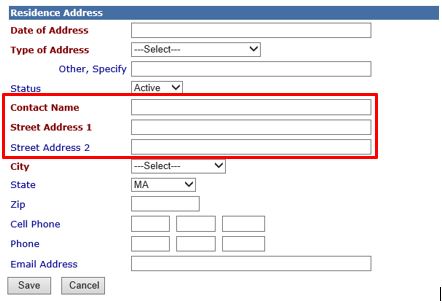
3.5 * Contact Name: Enter the contact name for this address entry. For example, if Participant’s parent was selected for Type of Address enter the name of the participant’s mother or father in this field. If Participant is selected for Type of Address this field will pre-populate.
3.6 *Street Address 1: Enter the street address for the residence (e.g. 123 Main Lane).
3.7 Street Address 2: If applicable, enter the building or apartment number of the residence (e.g. Apt. 2)
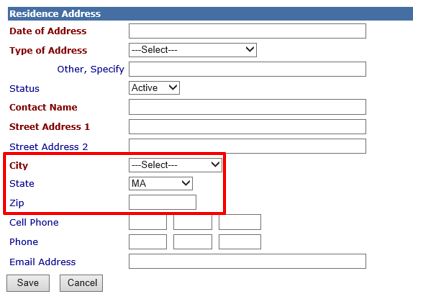
3.8 *City: Enter the city or town of the residence. The city entered does not have to be within the program’s catchment area. If the address is in a neighborhood of Boston, you must select “Boston”.
3.9 State: Select the state of the residence. The drop down defults to Massachusetts.
3.10 Zip: Enter the zip code for the residence. This entry must be a valid five digit zip code.
3.11 Cell Phone: Enter the contact’s cell phone number.
3.12 Phone: Enter the contact’s phone number.
3.13 Email Address: Enter the contact’s email address.
4. Save: Select to save the information.
5. Cancel: Select to return to the Participant Profile page without saving.
6. All active address records appear on the participant profile page. To view inactive records, select View Address History.

6.1 Click View to view the address record. You can view any inactive record in the “Address History” section but you may not edit them.
7. Keep address records up-to-date by updating the status of each address as needed. When you are notified about an address change, change the old address(es) status to “Inactive.”
7.1 On the Participant Profile page, click Edit next to the status you want to inactivate.
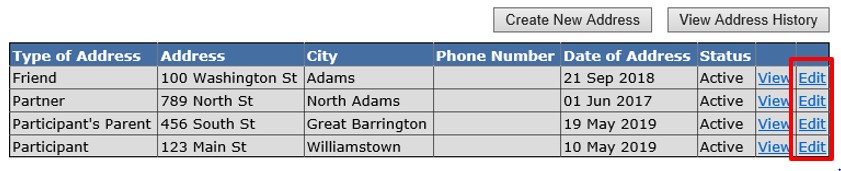
7.2 Under Status, select inactive from the dropdown menu.
7.3 Click Save to return to the Participant Profile page. The address record you just inactivated should no longer appear on the Participant Profile page.
Creating an Address Record (Sept 2019)
©2019 MA Children's Trust